Take It to the Max! Maximum Playlist Presentation Entry Efficiency
In this post, we’ll explain how you can schedule more efficiently and effectively moving forward.
Daktronics Commercial Software Training on 11/30/2017
Categories: Venus 1500 Training
Boy, that title is a mouthful, isn’t it? Don’t worry, we’re going to break it all down and explain how you can schedule more efficiently and effectively moving forward. We have already posted about scheduling many times, and while I’m sure most of you have read our posts faithfully, I’m also sure that some of you haven’t had the time.
Well, now is that time!
Click on the link below to learn all the best tricks when it comes to scheduling your content.
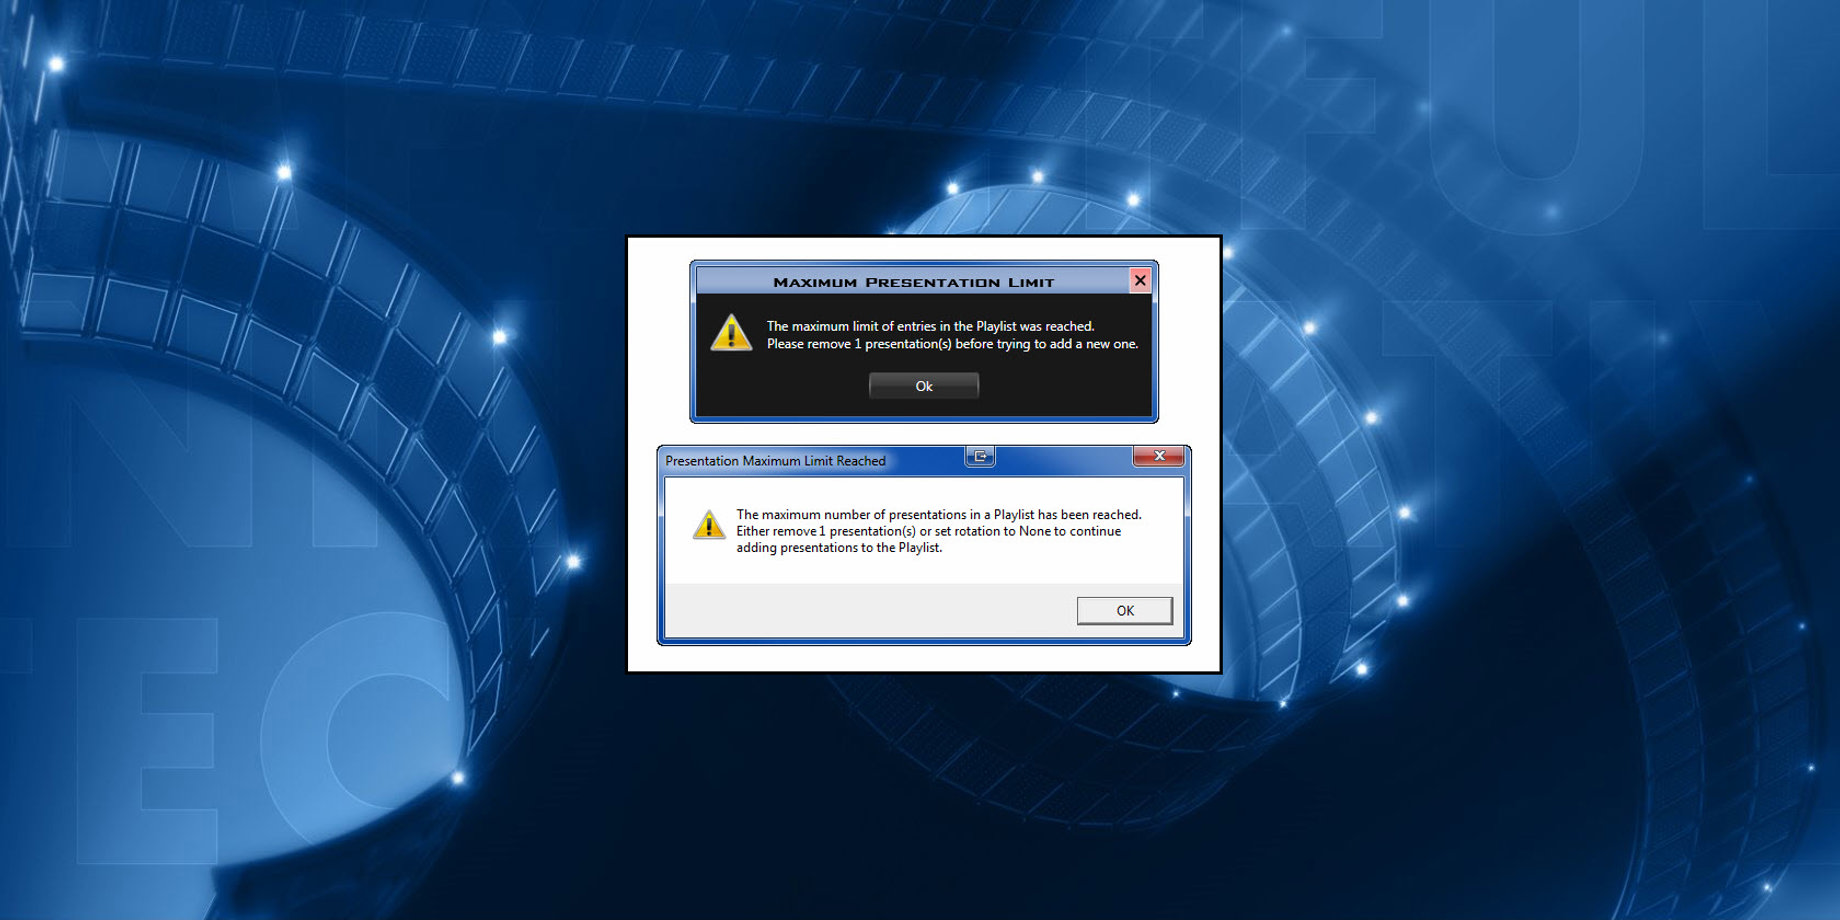
Have you seen an error message?
The primary reason we are writing this blog is to explain an error message that many of you have seen and contacted us about.
If any of you have ever received an error message saying, “Presentation Maximum Limit Reached,” there’s a good chance you called in and know the deal already. However, for the rest of you, keep reading to find out how to avoid receiving this error in the future.
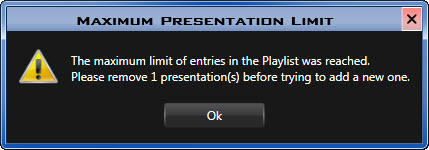
Continuous Mode Error:
The Maximum limit of entries in the Playlist was reached.
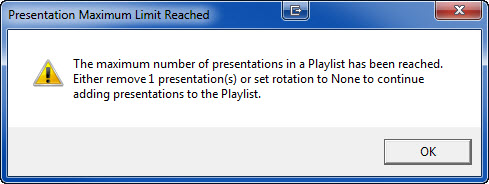
Scheduled Mode Error:
The maximum number of presentations in a Playlist has been reached.
If you’re seeing this message in your Venus 1500 V4 software, then you’re in the right place. Basically, you have too many files scheduled at one time.
The file limit varies depending on which Playlist Mode you are in. For those of you who schedule in Continuous Playlist Mode, you will have a limit of 100 entries. For those of you in Scheduled Playlist Mode, you will have a limit of 200 entries. To learn more about the different Playlist Modes, please click below to read our previous posts on them.
Who does the Maximum Presentation Limit affect?
For a lot of folks, those seem like huge numbers to worry about, but for some of us, having to schedule that many files is a reality. Let’s discuss who this will and won’t affect.
The Maximum Presentation Limit will only affect those of you with Galaxy display models AF-30XX through AF-37XX. Those of you with GalaxyPro and GP4 displays will not have to worry about receiving this error or reaching any limit.
What counts towards the Maximum Entry Limit?
We must discuss one more thing before we move on. Namely, what is a presentation/message/file? How are they defined in the Venus 1500 V4 software? What counts towards the Maximum Entry Limit, and what does not? What constitutes an entry?
A presentation/message/file are all the same thing, and refer to a single (1) piece of creative content, or 1 entry. This single piece of content can be composed of 1 or more layouts when you create it in Content Studio.

A playlist can contain a single presentation (entry) or multiple presentations (entries).

Therefore, each presentation contained within a playlist is 1 entry and counts towards the 200-entry maximum. Even if the presentation is composed of 20 layouts, it still only counts as 1 entry. However, if you have that same presentation contained within 2 playlists, then it counts as 2 entries, leaving you room for 198 more entries.
For example, if you have 10 playlists with 20 presentations, that is a total of 200 presentations. Each presentation listed is considered 1 entry, even if it is a duplicate message added within single or multiple playlists.
Update Venus 1500 V4 to the latest compatible version
Now that we know who this could potentially affect and what the difference between a playlist and a presentation is, we can schedule your content more efficiently to avoid reaching the Maximum Entry Limit.
First, make sure you are running the latest compatible version of Venus 1500 V4 on your computer. Choose from 3 versions on our download page:
- Venus 1500 Version 4.22.2 is compatible with Windows 7, 8 and 10.
- Venus 1500 Version 4.20.4 is compatible with Windows XP and Vista.
- Venus 1500 Version 4.19.2 is for 56K Phone Modem Users.
If you are running a version of Venus 1500 V4 older than those listed above, then it is time to update today! Updating will give you access to additional features and also remove any known problems existing in older software versions.
If you are using a version of the software older than Venus 1500 V4.9, then you can clear out expired playlists from your schedule to allow adding additional presentations. Some older software versions counted presentations from expired playlists towards the total number of entries.
Trainer Tip: For those of you running Venus 1500 V4.9 or older and cannot update to a newer version, you can remove expired playlists by switching to the Details View in your Schedule Tab. Sort by the clicking on end date column.
Then click and click to highlight each expired playlist and click on the blue Remove button. After you have removed all the expired playlists, go ahead and click Publish To Display.
Details View is only available from version 4.4 and newer. Older versions need to use calendars on left side of the Schedule Tab to browse to past dates and delete playlists.
With the latest compatible version of Venus 1500 V4 downloaded onto your computer, you are ready to schedule with maximum efficiency! Basically, we have 3 ideas to help you avoid reaching the Maximum Entry Limit.
Continuous Mode Solution:
Please remove 1 presentation(s) before trying to add a new one.
Scheduled Mode Solution:
Either remove 1 presentation(s) or set rotation to None to continue adding presentations to the Playlist.
The first idea: simply remove presentation(s) from your schedule and then add your new presentations ones.
- Launch the Venus 1500 V4 software.
- Click on the Schedule Tab.
- Click and highlight the presentation(s) that you want to remove.
- In Continuous Mode, after you select the presentation(s), you will click on the blue Remove button.
- In Scheduled Mode, you will open a playlist to select the presentation(s), and then you will click on the green subtract [-} button.
- Add the new presentation(s) to your schedule.
- In Continuous Mode, you will click the blue Add button to select your presentation(s) and then click Open.
- In Scheduled Mode, you will click the blue Add button and choose Playlist from the dropdown to start a new playlist or double-click on an existing Playlist to open it up. From there, you will click the green plus [+] button to select your presentation(s) and then click Ok.
- Click Publish To Display.
The second idea: simply combine messages. Venus 1500 V4 will only count the presentations contained in each playlist, not the number of layouts with a presentation.
- Launch the Venus 1500 V4 software.
- Click on the Content Tab.
- Click on Create or double-click the presentation(s) you will be combining to open each presentation to be combined in Content Studio.
- Select the Layout Storyboard tab if not already selected.
- To copy layouts:
- Hold down [Ctrl] key and single click on each layout to select the layouts.
- Click the Copy Layout button.
- Then open the other presentation you want to paste the layouts to in Content Studio.
- Select the Layout Storyboard tab if not already selected.
- To paste layouts:
- Select Paste Layout button to paste layouts into another message.
- This will then paste all layouts from the previous presentation to the 2nd presentation.
- Click the Application Menu (Orange V) in the upper left corner, choose Save As and give the presentation a new name.
- Schedule the new presentation in place of the old two presentations.
The third idea: use the recurrence feature. You see, Venus 1500 V4 will count a single presentation multiple times if it is contained in multiple playlists. Therefore, if you schedule a recurrence pattern for the presentation, it will only be counted once because it will only be contained in one playlist.
- Launch the Venus 1500 V4 software.
- Click the Schedule Tab.
- Click on the blue Add button and choose Playlist from the dropdown.
- Provide the playlist with a Description that is relevant.
- Click the Green Plus Sign [+] button to browse and select the desired presentation(s), and click Open.
- On the Date and Time tab, set the dates and times you would like the presentation(s) to run.
- Click the Recurrence Tab.
- Choose which recurrent pattern you would like to apply to this playlist.
- Yearly will allow you to schedule the presentation(s) to play on the same date and time every year until the final end date of the playlist.
- Monthly will allow you to schedule the presentation(s) to play on the same date and time each month until the final end date of the playlist.
- Weekly will allow you to schedule the presentation(s) to play on the date and time for each day of the week that is check marked until the final end date of the playlist.
- Click Ok.
- Click Publish To Display.
We hope you find this information useful in your content scheduling endeavors. Be sure to click on the orange “Receive Email Updates” button on the right side of the page to subscribe so you never miss a blog post! Thanks for reading!!
Related Knowledge Base Articles:
- Receiving a maximum entry error when trying to create a new playlist or add presentations to an existing playlist
- Unable to schedule all presentations, Schedule limit has been reached