Venus Scheduling: How do I create a playlist in Venus Control Suite that will publish to my display?
Topic
- Create a playlist in Venus Control Suite
- Publish or schedule content in Venus Control Suite
- Add content to an existing playlist in Venus Control Suite?
- The playlist section has moved, how can I schedule content now?
Archived
Use this article:
Venus Scheduling: How do I schedule content in Venus Control Suite?
Environment
- Product: Venus Basic, Venus Select, Venus Professional, Venus Enterprise
- Components: Venus Scheduling, Venus Playlists
- Control System: Venus Cloud-Based, Venus Local
Steps
👇Click on the arrows below to expand & contract each section.
Playlist for simplified model & advertiser account
Access the Playlists.
- Log into Venus Control Suite Venus Accounts: How do I log in to Venus Control Suite?
- Choose Scheduling from the My Apps menu.
Select the blue Add New button to create a new playlist or click on an existing playlist to edit.
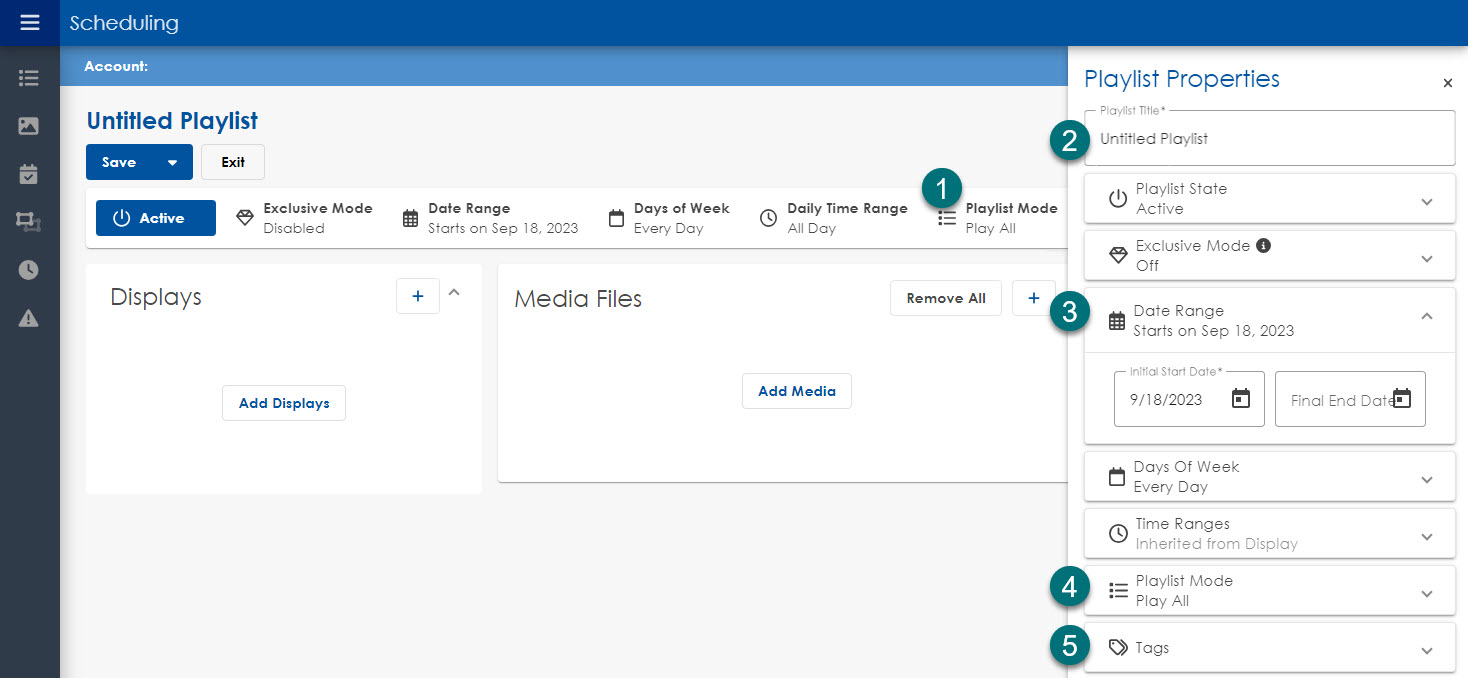
Edit the Playlist Properties
- At the top, click on any of the Playlist Properties and Playlist Properties will slide out from the right side.
- Enter general details.
- Add Playlist Title.
- Select a status. Note: Active playlists will send to the selected display(s) when saved. Inactive playlists will not send to the selected display(s).
- Timing
- Enter in Start and End Dates.
- Select the Days of the Week (The blue dot represents the days the playlist will run).
- If you want this content to run only during a specific time frame, select Set Custom Time Range. Enter the Start and End Times.
- Select Playlist Mode. -Play All vs Play One File.
- Apply any desired Tags.
- Click Confirm when done.
Add Displays
- Click Add Displays.
- Select the display(s) that will play the content in your playlist. Click Confirm when done.
Add Media
- Click Add Media Files to show the Media Library.
- Select desired media by dragging and dropping files or clicking the + button to the right of the file.
Note: To hide the Media Library, click the X in the top left corner of the Media Library shelf.
Save
Click Save or pick Save As from the drop down.
Note: Only playlists marked as Active will send to the selected display(s).
Playlist for ad grid model for display owner
- Click on the grid icon or the applications menu in the top right corner of Venus Control Suite.
- Select Scheduling under My Apps.
- Select the blue Add New button to create a new playlist or click on an existing playlist to edit.
- Under Playlist Association, select the account the playlist will be associated with.
- At the top, click on any of the Playlist Properties to launch the Playlist Properties window.
- Enter in a playlist name under Title.
- Select a status.
Note: Active playlists will send to the selected display(s) when saved. Inactive playlists will not send to the selected display(s). - Enter in Start and End Dates.
- Select the Days of the Week (The blue dot represents the days the playlist will run).
- If you want this content to run only during a specific time frame, select Set Custom Time Range. Enter the Start and End Times.
- Apply any desired Tags.
- Select Playlist Mode.
- Click Confirm when done.
Add Display
- Click Add Displays.
- Select the display(s) that will play the content in your playlist. Click Confirm when done.
- Click Add Media Files to show the Media Library.
- Select desired media by dragging and dropping files or clicking the + button to the right of the file.
Note: To hide the Media Library, click the X in the top left corner of the Media Library shelf. - To add custom constraints on creative, follow Venus Scheduling: How do I add custom time or day constraints to a playlist file in Venus Control Suite.
- Once done, click Save.
Note: Only playlists marked as Active will send to the selected display(s).
Note: Only accounts with sales made to the selected display(s) will play on the display(s).
KB ID: 000003642
DISCLAIMER: Use of this content may void the equipment warranty, please read the disclaimer prior to performing any service of the equipment.
DAKTRONICS DOES NOT PROMISE THAT THE CONTENT PROVIDED HEREIN IS ERROR-FREE OR THAT ANY DEFECTS WILL BE CORRECTED, OR THAT YOUR USE OF THE CONTENT WILL PROVIDE SPECIFIC RESULTS. THE CONTENT IS DELIVERED ON AN "AS-IS" AND "AS-AVAILABLE" BASIS. ALL INFORMATION PROVIDED IN THIS ARTICLE IS SUBJECT TO CHANGE WITHOUT NOTICE. DAKTRONICS DISCLAIMS ALL WARRANTIES, EXPRESS OR IMPLIED, INCLUDING ANY WARRANTIES OF ACCURACY, NON-INFRINGEMENT, MERCHANTABILITY AND FITNESS FOR A PARTICULAR PURPOSE. DAKTRONICS DISCLAIMS ANY AND ALL LIABILITY FOR THE ACTS, OMISSIONS AND CONDUCT OF YOU OR ANY THIRD PARTIES IN CONNECTION WITH OR RELATED TO YOUR USE OF THE CONTENT. ADJUSTMENT, REPAIR, OR SERVICE OF THE EQUIPMENT BY ANYONE OTHER THAN DAKTRONICS OR ITS AUTHORIZED REPAIR AGENTS MAY VOID THE EQUIPMENT WARRANTY. YOU ASSUME TOTAL RESPONSIBILITY FOR YOUR USE OF THE CONTENT AND ANY LINKED CONTENT. YOUR SOLE REMEDY AGAINST DAKTRONICS FOR DISSATISFACTION WITH THE CONTENT IS TO STOP USING THE CONTENT. THIS LIMITATION OF RELIEF IS A PART OF THE BARGAIN BETWEEN THE PARTIES.
The above disclaimer applies to any property damage, equipment failure, liability, infringement, or personal injury claim arising out of or in any way related to your use or application of the content, whether such claim is for breach of contract, tort, negligence or any other cause of action.