NovaStar: How do I set up NovaLCT V5.4.4.3 CTM 2.0.07404 smart module monitoring for receiver card temperature dimming and light sensor dimming?
Topic
- Receiver card temperature dimming
- Light sensor dimming
Environment
Components:NovaLCT V5.4.4.3 CTM 2.0.07404 located in the SharePoint: Shanghai Outdoor Product Thermal Dimming & Light Sensor Dimming - All Documents (sharepoint.com)
Applicable Product Series: This includes but not limited to DVX-2200N, RTX-2300”.
Before starting
- Verify the following items are on to enable dimming and smart modules monitoring:
- Monitoring and service of NovaLCT
- Control PC
- Sending box
- Verify the control cable is secure between the control PC and sending box.
- Install and configure the multi-function card. – NovaStar: How do I configure the Multi-Function Card MFN300?
- Install and configure the light sensor. – NovaStar: How do I configure the light sensor?
Steps
Access Monitoring
- Click Monitoring in NovaLCT. Do not use Monitoring (Trial).
- Click Configuration.
Configure Refresh
- In Refresh Period, check Automatic Refresh and input Refresh Period (recommended 60s).
- Set Rereading Times when failing to read status (recommended 3 times).
- Click Save.
Configure Hardware Settings
- In Hardware Settings, check Connect to Smart Module and Refresh Ribbon Cable.
- Click Save.
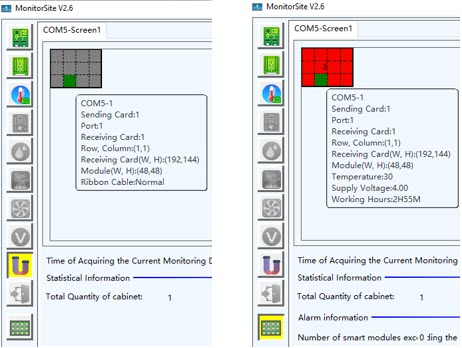
On MonitorSite window and homepage of NovaLCT, Ribbon and Module Status icon will be seen to light up.
This is an example where a cabinet of 3-module high and 4-module wide has only one module connected to the hub board (the green square).
Configure Monitoring Control
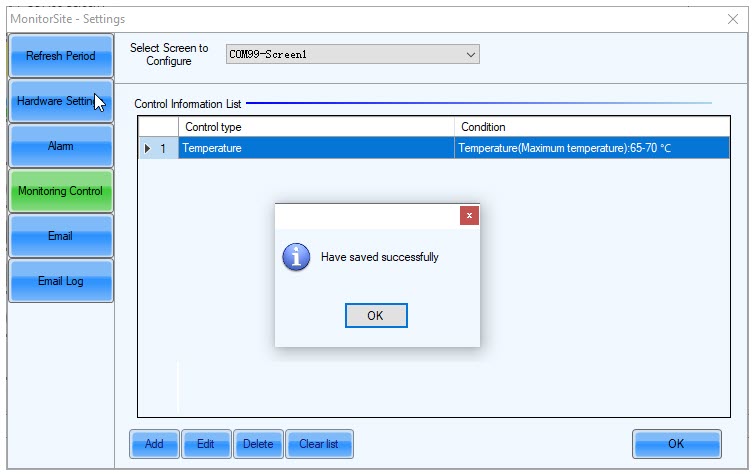
In Monitoring Control, click Add to set up strategies for the selected screen.
- Select Temperature from Control Type drop down list.
- Select Maximum temperature and check Brightness Adjustment.
- Set up the temperature range and brightness level by following the rules below. Click OK.
- 65°C < T < 70°C: 70% brightness
- 75°C < T < 80°C: 30% brightness
- 85°C < T < 90°C: 0% brightness
Click OK to save.
Configure Brightness Setting
- On the far right of taskbar in control PC, right click MonitorSite
and open Brightness Advanced Setting.
- Check Enable Brightness Gradient.
- Set up Environment brightness detecting cycle (recommended 30s) and Times of reading environment brightness (recommended 5 times).
- Set up Start time and End time for the light sensor to work, depending on the local conditions of project site. It is typically from 4pm today to 9am the next day when the thermal dimming control is not likely to be triggered because the algorithm of light sensor controlling brightness contradicts that of thermal dimming.
- Click Save.
KB ID: 000026411
DISCLAIMER: Use of this content may void the equipment warranty, please read the disclaimer prior to performing any service of the equipment.
DAKTRONICS DOES NOT PROMISE THAT THE CONTENT PROVIDED HEREIN IS ERROR-FREE OR THAT ANY DEFECTS WILL BE CORRECTED, OR THAT YOUR USE OF THE CONTENT WILL PROVIDE SPECIFIC RESULTS. THE CONTENT IS DELIVERED ON AN "AS-IS" AND "AS-AVAILABLE" BASIS. ALL INFORMATION PROVIDED IN THIS ARTICLE IS SUBJECT TO CHANGE WITHOUT NOTICE. DAKTRONICS DISCLAIMS ALL WARRANTIES, EXPRESS OR IMPLIED, INCLUDING ANY WARRANTIES OF ACCURACY, NON-INFRINGEMENT, MERCHANTABILITY AND FITNESS FOR A PARTICULAR PURPOSE. DAKTRONICS DISCLAIMS ANY AND ALL LIABILITY FOR THE ACTS, OMISSIONS AND CONDUCT OF YOU OR ANY THIRD PARTIES IN CONNECTION WITH OR RELATED TO YOUR USE OF THE CONTENT. ADJUSTMENT, REPAIR, OR SERVICE OF THE EQUIPMENT BY ANYONE OTHER THAN DAKTRONICS OR ITS AUTHORIZED REPAIR AGENTS MAY VOID THE EQUIPMENT WARRANTY. YOU ASSUME TOTAL RESPONSIBILITY FOR YOUR USE OF THE CONTENT AND ANY LINKED CONTENT. YOUR SOLE REMEDY AGAINST DAKTRONICS FOR DISSATISFACTION WITH THE CONTENT IS TO STOP USING THE CONTENT. THIS LIMITATION OF RELIEF IS A PART OF THE BARGAIN BETWEEN THE PARTIES.
The above disclaimer applies to any property damage, equipment failure, liability, infringement, or personal injury claim arising out of or in any way related to your use or application of the content, whether such claim is for breach of contract, tort, negligence or any other cause of action.