Syncback: How do I install and configure SyncBack Free Utility for Daktronics systems?
Topic
This article will explain how to setup and use the SyncBack Free Utility. This application allows vital information to be copied onto a backup computer. With proper mirroring, the computers can be switched between primary and backup systems with minimal interruption of display use.
Environment
- Product:
- Component: SyncBack Free
- Control System: DMP-7000, DMP-8000, NAS, Primary/Back up
Steps
Profile Setup
- Click here to download the installer on the back up machine
- Launch SyncBack Free on the backup machine
- Select "New" to create a new profile
- Choose a profile name that explains the purpose of the profile:
- For DMP-8000 "8000MirrorContent"
- For Nucleus Backup "Nucleus Backup
- Choose "Backup" as the profile type
- Select "Next"
Source and Destination:
- Make appropriate selection of whether the source and destination will be on the network or an FTP
- Select Done
A prompt will pop up displaying that the main profile setup window will now open and that changes can now be made to it.
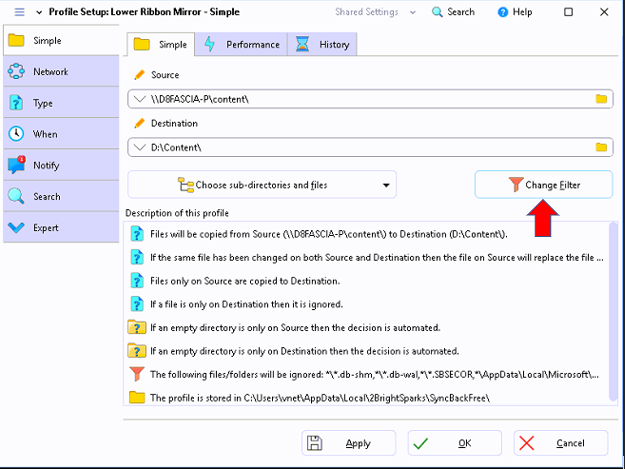
Simple Tab
Reference the figure below while setting up the configuration in the Profile Setup dialog box.
- Source -the location of the content on the primary computer that should be backed up.
- Destination field should be local
- On DMP-7000 machines it would be either C:\V7000\ (2RU computer) or D:\V7000\ (3RU computer)
- On DMP-8000 machines, it would be the Content folder
- Sub-dirs field, choose "Include all sub-directories and their files (and use the directory filter)"
- Simple tab, choose "Backup the source directory files, including all its sub-directories"
- Click "Apply"
Advanced Tab
- What to do if the same file has been changed in the Source and destination
- Choose: If the same file has been changed on both Source and Destination then the file on Source will replace the file on Destination.
- What to do if a file is in the source but not in the destination
- Choose: Files will be copied from Source to Destination
- What to do if a file is in the destination but not in the source
Choose: Files only on Source are copied to Destination
Change Filter Tab
With the recent version of SyncBack Free the following steps are not necessary as they are done automatically during install. The following should be checked if troubleshooting is needed.
-
Remove *.* from the "File to Copy" box.
-
Under "Files NOT to copy" list. Add V7Shell.AVI & V7VE.AVI
-
Verify the wildcard character (*) under directories to copy.
-
Click the "Add" button under "Files to copy" and proceed to the next step.
-
Each file type must be added individually. Use the wildcard (*) before the period preceding the file extension. After entering the value, click "OK". Example: *.AVI
-
- For DMP-8000 mirroring, typical file types to copy include: AVI, BMP, CSS, DPF, EOT, GIF, HTM, HTML, JPEG, JPG, JS, JSON, LAYOUT, MOV, MP3, MP4, MPG, OGG, PNG, SCRIPT, SVG, SVGZ, SWF, TGA, TFF, TIF, URI, VMPL, VMPF, WAV, WEBM, WMV, WOFF, XML - do not sync the media/fusion database.
- For DMP-7000 mirroring, typical file types to copy include: AVI, BMP, CA7, DC, DCG, DCP, JPG, ITF, PNG, SD7, SC7, SQ7, SP7, TI7, TXT, VLC, VMPF, WAV
Note: For DMP-8000, the DID and DSRC files may be copied as well using a separate Syncback profile. If electing to include these file types, please setup additional profiles in Syncback and ensure these directories are shared on the source computer:
C:\ProgramData\Daktronics\DDS\DID
C:\ProgramData\Daktronics\Vnet4\Data
Sub-directories Tab
-
Shown with default settings. (Nothing is checked.)
-
When all tabs in the Profile Setup are configured as desired, click "OK"
Choose "No" to skip the simulation run.
-
SyncBack should now display the new profile and "Next Run" will be blank.
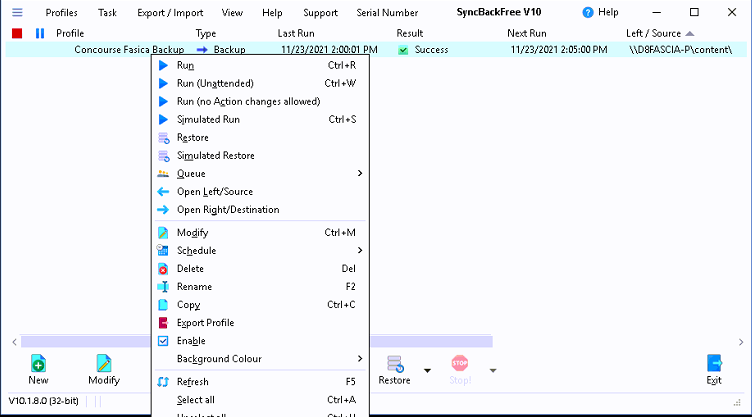
Create the Schedule
-
Right click the new profile and choose "Schedule" from the menu. From the bottom of SyncBack Free.
-
Click "Yes" to create a schedule
-
Click "OK" on the Warning prompt.
-
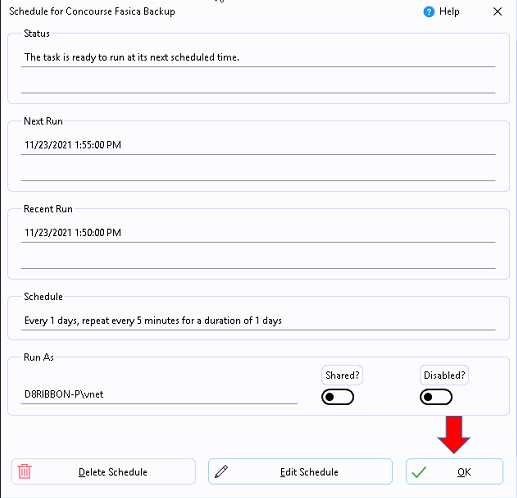
Schedule Tab
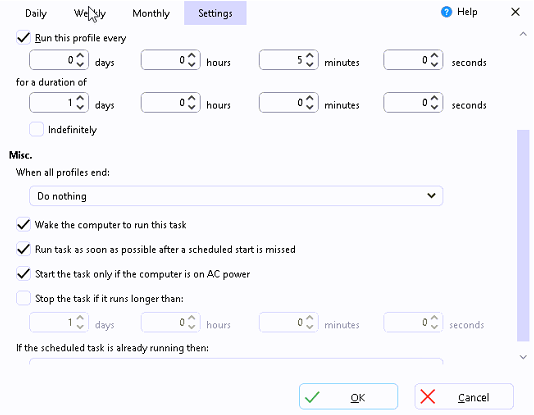
When the schedule settings open, select the Settings tab up top
Configure this tab with the settings seen in the images below.
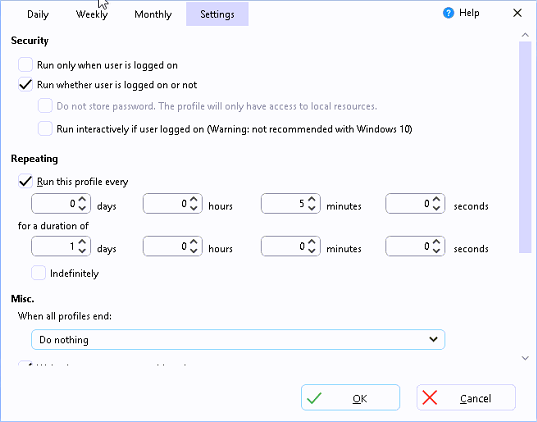
* The OK checkmark in the Settings tab may be greyed out. Move to the next step after applying the settings.
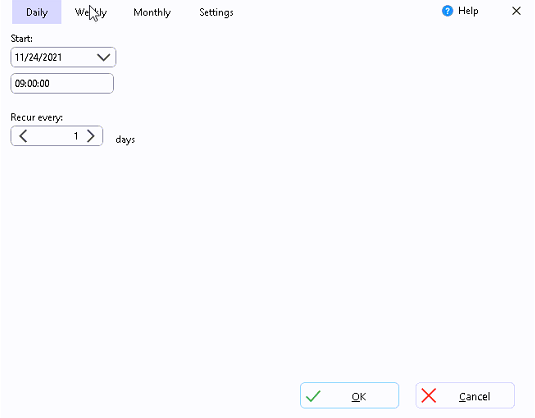
Schedule Options:
-
Configure the "Start Date:" to be a past date and check "Repeat task" on the Daily tab. Complete the remaining options with the settings in the figure below. When finished, click "save".
Scheduling configuration is complete, click "OK"
Manually Run the Application
It is advisable to manually run SyncBack prior to an event to ensure the primary computer and backup are mirrored
-
To run the backup manually, right click on the profile name and choose "Run" from the menu
-
Once the backup runs for the first time, a "Differences for profile" box will appear to list differences between the source and destination. To make the noted changes to the destination, click "Continue Run"
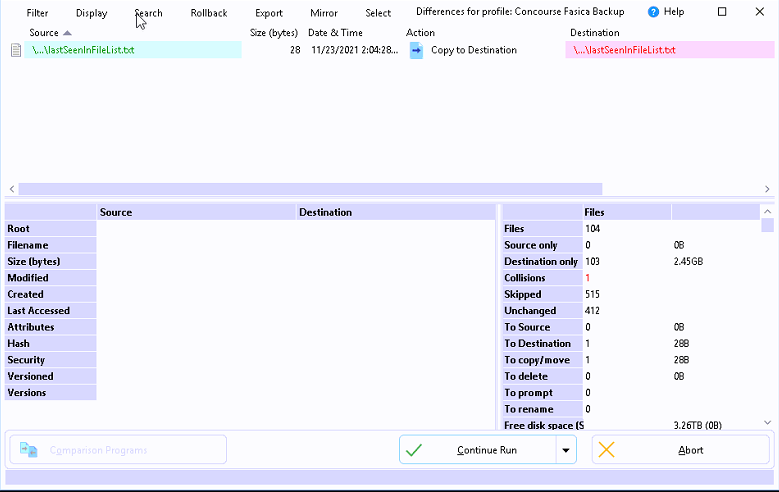
-
When backup up is complete, the result column should indicate "Success"

KB ID: 000024436
DISCLAIMER: Use of this content may void the equipment warranty, please read the disclaimer prior to performing any service of the equipment.
DAKTRONICS DOES NOT PROMISE THAT THE CONTENT PROVIDED HEREIN IS ERROR-FREE OR THAT ANY DEFECTS WILL BE CORRECTED, OR THAT YOUR USE OF THE CONTENT WILL PROVIDE SPECIFIC RESULTS. THE CONTENT IS DELIVERED ON AN "AS-IS" AND "AS-AVAILABLE" BASIS. ALL INFORMATION PROVIDED IN THIS ARTICLE IS SUBJECT TO CHANGE WITHOUT NOTICE. DAKTRONICS DISCLAIMS ALL WARRANTIES, EXPRESS OR IMPLIED, INCLUDING ANY WARRANTIES OF ACCURACY, NON-INFRINGEMENT, MERCHANTABILITY AND FITNESS FOR A PARTICULAR PURPOSE. DAKTRONICS DISCLAIMS ANY AND ALL LIABILITY FOR THE ACTS, OMISSIONS AND CONDUCT OF YOU OR ANY THIRD PARTIES IN CONNECTION WITH OR RELATED TO YOUR USE OF THE CONTENT. ADJUSTMENT, REPAIR, OR SERVICE OF THE EQUIPMENT BY ANYONE OTHER THAN DAKTRONICS OR ITS AUTHORIZED REPAIR AGENTS MAY VOID THE EQUIPMENT WARRANTY. YOU ASSUME TOTAL RESPONSIBILITY FOR YOUR USE OF THE CONTENT AND ANY LINKED CONTENT. YOUR SOLE REMEDY AGAINST DAKTRONICS FOR DISSATISFACTION WITH THE CONTENT IS TO STOP USING THE CONTENT. THIS LIMITATION OF RELIEF IS A PART OF THE BARGAIN BETWEEN THE PARTIES.
The above disclaimer applies to any property damage, equipment failure, liability, infringement, or personal injury claim arising out of or in any way related to your use or application of the content, whether such claim is for breach of contract, tort, negligence or any other cause of action.